MG-Cars.com
Triumph TR6 New Carpet Installation Q BBS discussion at MG-Cars.net

MG-Cars.net
Welcome to our resource for MG Car Information.
Recommendations
Parts
TR parts and Triumph parts, TR bits, Triumph Car Spares and accessories are available for TR2, TR3, TR3A, TR4, TR4A, TR5, TR6, TR7, TR8, Spitfire and Stag and other TR models are available from British car spares and parts company LBCarCo.
Triumph TR6 - New Carpet Installation Q
| For those who have redone their interiors can you tell me how you fastened your smaller carpet bits like the kick panels, the piece on the firewall above the tranny cover, the small apron in back over the tunnel. I'm thinking about using small black domes placed out of sight to keep things in place. I do not want to glue stuff and I doubt velcro would stick to the underside of the carpet pieces... well maybe I could have them sewed on... Let me know what you did. Thanks! Ken |
| Ken Shaddock |
| Ken, Original were glued on using contact cement. Suggest you reconsider your decision. db |
| Doug Baker |
| Thx Doug... just not sure I want to close the door on accessing these areas if need be. Maybe if I used the glue in patches so to speak so I could reopen then with a putty knife. I agree that glue would ensure a neat fit and look. K |
| Ken Shaddock |
| Hi Ken I used contact glue on these pieces except the side kick panels where I used concealed screws. The floor, tranny cover and driveshaft tunnel are all snapped in. Regardless of what you do you need to attach (screw or glue velcro) something to the body where the carpet is going. I think you will find the rear tunnel cover too loose if you do not glue it down but that is my opinion. I don't foresee a need to remove these pieces for routine work and my experience has been with care you can lift the piece if it has been contact glued and use it again. Good luck with your choice. |
| Michael Petryschuk |
| Hi Mike... when you say 'all snapped in' re tranny, floor, etc. what you you mean. Did you use a snap or dome... my similar large pieces seem to stay put without any fastener. I see your point on the kick panels. Once I am satisfied with the wiring and plastic tubing installed to take the water away from the bulkhead and upper firewall area I should be able to cover those areas with carpet. Will give it a go when ready for that step. I'm just in the process of re&reìng the rubber overriders and bumper brackets right now. Thx. Ken |
| Ken Shaddock |
| Hi Ken The carpet kit I purchased included button snaps where the male snap is riveted to the floor, tranny cover or drive shaft tunnel. The carpet has the female snap and the carpet is snapped in place. Each piece has four snaps I believe. (front floor both sides, tranny carpet and driveshaft tunnel carpet) The one piece that goes between the tranny cover and the driveshaft tunnel cover is tucked in under the tranny cover piece and driveshaft cover piece. The rear floor piece (both sides) are secured by the seat rails Clear as mud now? If I had pictures that would help but I don't. Sorry. |
| Michael Petryschuk |
| Understood... that was my initial thought... using snaps or domes I call them. One can buy them and the tool used to attach the female halves to the carpet but I won't rule out the contact cement in places either. Always good to hear from others before jumping. If I were able to make BCD this year I'd have my list of Q's with me and of course a camera. Thx again. K |
| Ken Shaddock |
| Ken I believe this is what you want for the carpets to the floor area. (items 3,4,and 5)http://www.mossmotors.com/Shop/ViewProducts.aspx?PlateIndexID=32952&SortOrder=14 You will probably already have the male snap screwed to the floor pan. Item 4 is installed in the carpet and are virtually invisible. As said, this is ONLY for the 2 foot well floor pieces so these carpets can be removed. On both driver and passenger sides up at the very front where the carpet goes "up" the fire wall, there are snaps there also. Again, they might already be there from original. Mike has it on the under the seat 2 pieces. That little piece up on top of the tranny cover is glued in place. The outside kick pannels are screwed into place. You will see the screw holes as drilled from the factory. The fun part is aligning the hole with the screw. I went to crappy tire and got black upholstery screws (I used these same screws to attach most of the boot trim pannels also). As said, you glue the carpet to the 2 tranny tunnel pieces. They come off with the tranny tunnel so no need to worry about accessing this area. Ken, I hope you are also installing a sound deadening material under the kit specifically one with a foil backing. (MOSS # 409-015) Finally the best glue on the market is 3m General Trim Spray Adhesive.(crappy tire I think). Rick |
| Rick Crawford |
| Have printed this thread Rick... thank you for your input also. And for the reminder on the foil backed sound deadening material... I would have forgotten it. I have emailed my usual source to see if they carry it. As for the carpet section that is glued... the firewall piece above the tranny tunnel, does the sound deadening material also work with the glue? K |
| Ken Shaddock |
| Yes Foil to the metal. Do not bother trying to remove it after it is glued in place. Then spray underside of carpet and the felt of the head shield. Again, once they come in contact with each other, no point trying to separate. The bulk head piece does not have the sound deadening material behind it...no point. Rick |
| Rick Crawford |
| Hi y'all... I have completed the sound and heat shield install and replaced all of the carpet including the bit over the tranny hump on the firewall and the kick panels. There's a nice difference re comfort and noise reduction. Thanks to all of you for the guidance. I used the 3M spray adhesive where that made sense, snaps/domes/screws in other places where I may want access in future and just plain snug fitting in some spots. I now hear my sweet exhaust note over the squeaks and the engine noise in the cabin is minimal. Tedious job but well worth all the effort. As they say at McDonalds... I'm lovin' it! Ken |
| Ken Shaddock |
| Since I'm hogging this BBS let me add something else. This may be old hat to some of you but while stuffing my head into the footwells (a version of foot in mouth) I fould a tag hanging on a wiring harness atop the left kick panel area drivers side dated March 3, 1976. It read: "In case of complaint please return this label with the faulty component". The VIN / Commission plate on the car dates March 1976. Just a very nice little tidbit that us old car guys love to see. Now if only I had a bill of sale and some history pre 1990... KTS 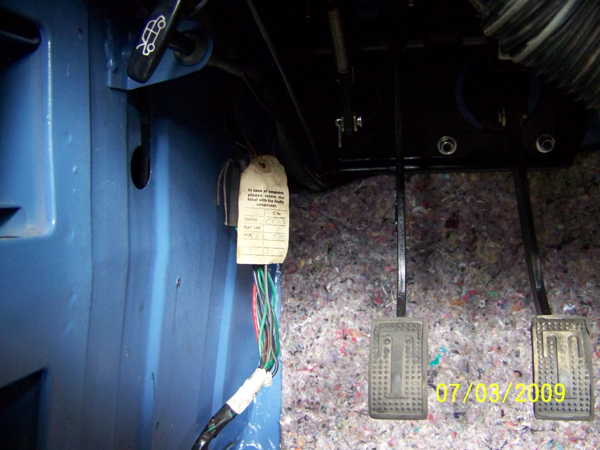 |
| Ken Shaddock |
This thread was discussed between 26/05/2009 and 06/07/2009
Triumph TR6 index